Sunday, December 7, 2014

Best Ever Soft Caramels (aka Mrs. Allen's Candy)

I'm transferring this post from my family blog (circa 2010) here for easier look-up and access... for myself (wink) and my family. Britt texted me just the other day to get the recipe and it took me a while to find it on the blog (and Pinterest). No more.

I'll be making my first batch of these today. I can't wait.


(12.07.10)
I was trying to find the only picture I recall of my Grandma G. making Christmas candy. I can see the picture clearly in my mind... she's wearing purple, and holding a pan of some kind of sweet homemade confection. But this hasn't been my lucky picture-finding-morning (still haven't run across it), and as usual, I don't have much time.

In my search, however, I ran across this picture (circa 1985):
This is a picture of my Aunt Carol's family at the funeral of her husband (Uncle Dick). Grandma G. is on the bottom right, next to Aunt Carol (middle). I am only left to assume that the sweet elderly lady on the left is my Aunt Carol's mother.

What does all that have to do with making Christmas candy? From my recollection, I believe that my Aunt Carol's mother is the famed "Mrs. Allen." In the Goldsberry family, we have been making Mrs. Allen's Candy at Christmastime for as long as I can remember. When I would ask who Mrs. Allen was (we were making HER candy, after all), I would be told that she was Aunt Carol's mom. (Note: this has been confirmed by my cousin.)

I still use the copy of the recipe I made back in high school for a Home Ec class, meticulously typed on a typewriter, laminated years later for preservation.

In the spirit of giving, I thought I would share this family favorite.


MRS. ALLEN'S CANDY
(you can call it Best Ever Soft Caramels, if you'd like)

1 (1 lb) pkg brown sugar (2-1/3 cups packed)
Scant cup light corn syrup ("Scant" meaning slightly under 1 cup)
1 can Eagle brand sweetened condensed milk
2 cubes margarine (I use butter)... 2 cubes = 2 sticks = 1 cup = 1/2 lb. (I'll clear that up right now)

Mix and cook in a large, heavy-bottomed pan on medium-high heat until comes to a boil. Turn to low and cook for 12-1/2 minutes, stirring all the time. Pour on buttered pan (9x13) over broken walnuts (walnuts are optional - I love them, but most of my family prefers no nuts). Cool and turn out and cut. We wrap these in waxed paper and keep them in the freezer (That helpful hint is on the back of my original recipe.)

NOTE: This recipe is NOT rocket science. Sometimes my candy turns out a little soft, sometimes a little on the harder side. I once boiled it for the 12-1/2 minutes on med/high heat, which I wouldn't recommend. I've learned that the dark, anodized aluminum pans tend to keep the heat in, so I don't use them when I make this candy because it turns out too hard. It's important to keep the heat low(ish) for the 12-1/2 minutes, however, on my stove, the low is too low, and the candy turns out a little too soft (sounds like the story of the three bears). I've tried using a candy thermometer so it could be more of an exact science (just right), but have since thrown exactness to the wind and make it in the spirit it was originally intended - ease... and delight at the perfect batch (which is about 95% of the time - the odds are in your favor).

Enjoy!

Cranberry-Orange Bread


This recipe originally came from here. I, however, did not have Chobani yogurt on hand, so I used Dannon Oikos 0% Fat Plain. Shhhhh.... don't tell.

I could eat this bread all day. Not too sweet, the crunch of nuts, and tanginess of fresh cranberries... yum-o!

The recipe calls for 3/4 c. orange juice. I decided to use some {oldish} cuties (clementines) that were starting to dry up a bit. I'm all for using what you have and trying not to waste. I knew nobody was going to eat those cuties (they hadn't been the yummiest from the get-go, which was disappointing), and figured baking with them was the perfect economical solution. You certainly could use delicious fresh, flavorful oranges, or even orange juice made from concentrate.

I used only the peel from a couple of the better looking cuties (clementines), then supplemented with McCormick dried orange peel.


I just have to say that I was baking at the perfect time of day. I love it when the sunlight shines into the kitchen, and loved how it was reflecting off of my bowl as I was mixing and snapping a few pics.


As I was grabbing a loaf pan, this little baby caught my eye. Remember the old Corningware? With the blue flowers? I inherited this {vintage} dish from my Grandma G, so I fondly thought of her as I baked.

(Can you see Jack lounging in the sunlight by the glass door? He was loving it, too.)


MY FAVORITE CRANBERRY BREAD

2 cups all-purpose flour
1-1/2 tsp. baking powder
1/2 tsp. baking soda
1/2 tsp. salt
3/4 cup plain Greek yogurt
1 cup sugar
1 large egg
3/4 cup orange juice
1 Tbs. orange zest (or dried orange peel... or a combination)
1-1/2 cups fresh whole cranberries
1/2 cup walnuts, roughly chopped

Whisk together flour, baking powder, baking soda, salt, and orange zest. Set aside.

In a large bowl, whisk together yogurt, sugar, egg, and orange juice. Stir in the flour mixture, then gently stir in cranberries and walnuts.

Put into a greased loaf pan and bake at 350 degrees until a toothpick inserted into center comes out clean, 50 to 60 minutes. Cool 10 minutes, then remove from pan to cool. Slice and serve.

Sooooo yummy.

Thursday, September 18, 2014

Layered Bean Dip (Best Ever)


I volunteered to bring a "cold dip" to the middle school for the teachers to enjoy prior to a long night of parent/teacher conferences. I don't usually volunteer for food items, and as of late prefer the simple assignments - usually the hearing and vision screening or working the book fair. For whatever reason (a near-empty sign-up genius form), I volunteered.

I always envision things going easily. Thursdays are generally a good "free" day for me, and the only other thing on my calendar was a YW meeting in the morning. I made sure I had all the ingredients, purchasing sour cream, cilantro, and green onions (and I couldn't resist the buy-2-get-3-free 7-UP products deal) the night before from the Safeway directly connected to my salon that I had tirelessly worked at all day. Safeway's entire system was down, which I was unaware of until I graced the check-out line. "Cash or check only," I was told. Luckily I hadn't made my deposit for the night (at the credit union directly connected to the salon on the other side), and had some cash on hand. The cashier calculated totals in her head, gave me a grand total of $18. That was easy.

In the middle of the YW meeting my phone rang. It was Lex, so I excused myself and took the call. She had been sent home from her new job because she didn't have her social security card. If she didn't bring it back to her new place of employment by 5pm that evening, she no longer had a job. I felt sick. I had sent the card to her in the mail on Monday, but I have had numerous experiences with the Provo post office that make me question their ability to properly handle the mail. I told her to go home and wait for the mail - maybe it would come today. I rejoined my meeting, but immediately texted Bill and Britt for backup. We were so thrilled that Lex had a job that she needs so desperately to save money for her next school year, and I felt devastated that there was a real and probable chance that she was going to lose it.

Long story short (okay, semi-short), Billy-my-hero found a place where Lex could obtain her birth certificate TODAY, a mere 1.1 miles from her Provo residence. She drove there, paid her $20 fee, picked up the certificate, and headed back to work. Phew. Catastrophe averted. 

Needless to say, my meeting ran long, I had to make an emergency run to the bank to transfer some moo-lah to my destitute Lex (that's why she needs the job so darn bad), then ran back home to throw together my bean dip. Of course my day couldn't run as smoothly as I had imagined it when I volunteered to help.

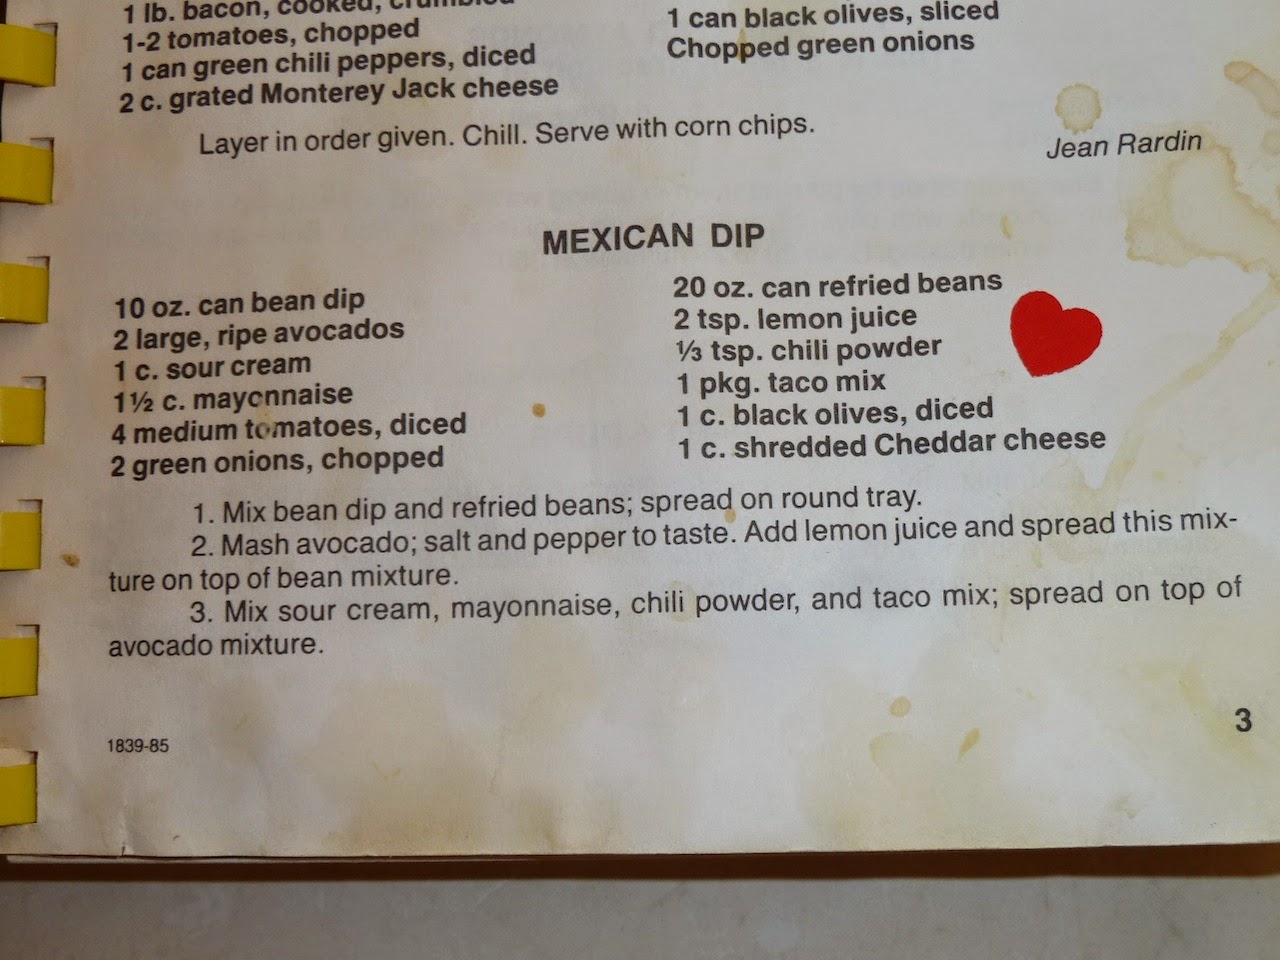
In the midst of the chaos, I snapped pictures. That's how I do. I had to post this, my favorite bean dip recipe, originally found here:
 Another one of my wedding gifts, this time from my MIL.
(This cover isn't really connected either)

Here's a portion of the recipe (the rest is on the back and I didn't see purpose in taking a picture of it:

I will be sharing my modified version.

THE BEST 7-LAYER BEAN DIP EVER

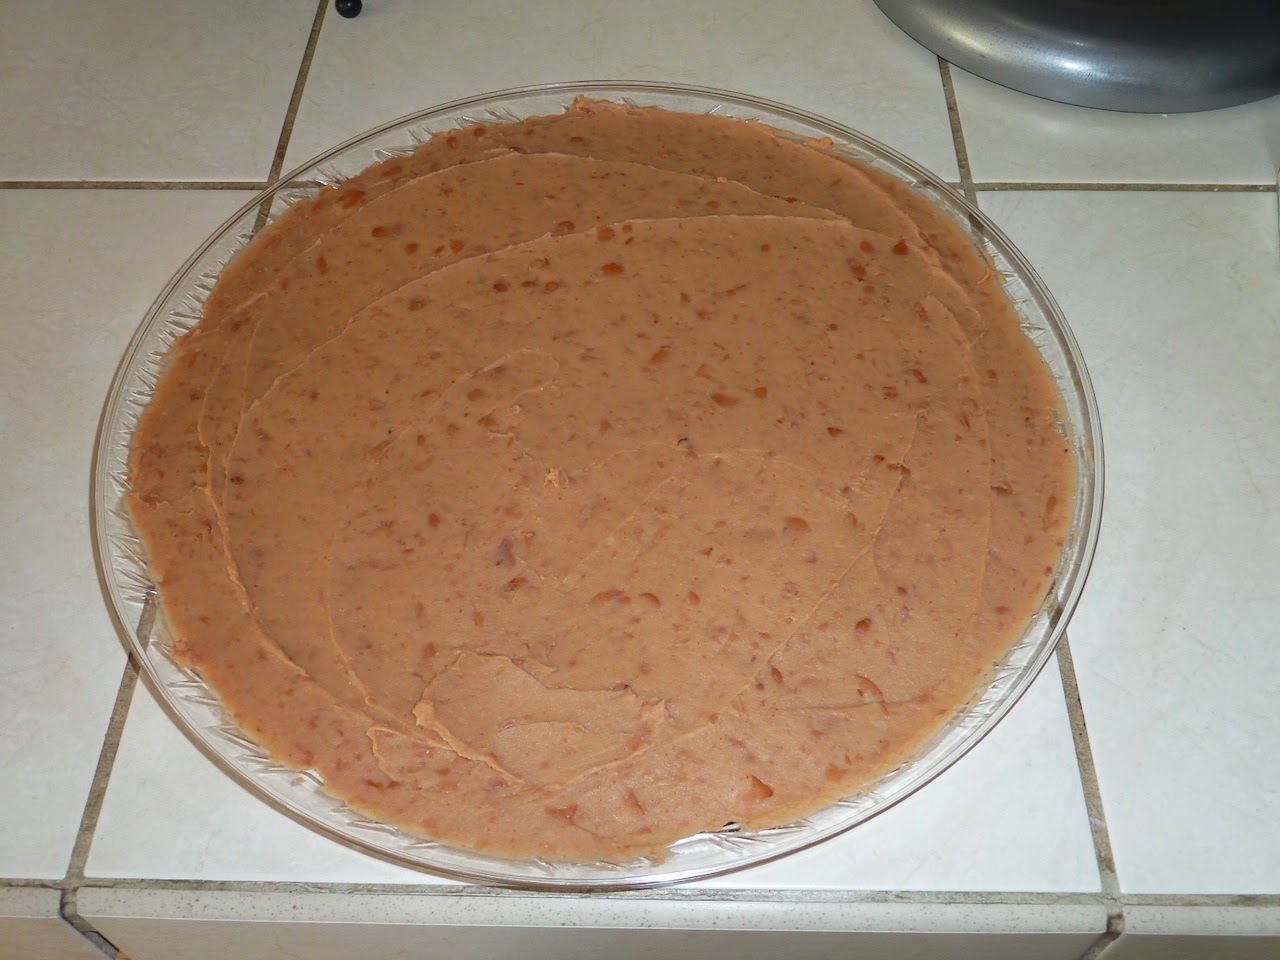
Start with 2 (15oz) cans refried beans. Mix them together and smooth onto a platter. I prefer round, and find great pleasure in the smoothing part of the layered dip process. An offset spatula is my best friend.

Mash up two large ripe avocados with salt to taste and 1 to 2 tsp. lemon juice. Yes, I used lemon juice from a bottle. Sometimes I skip this step when 1) I don't have any avocados on hand, 2) I can't find any ripe avocados for purchase, or 3) avocados are ridiculously priced. It's still really good, I promise. Spread the avocado mixture over the bean layer, leaving a slight edge so your next layer will completely cover it and prevent it from turning a nasty brown color.

This is the layer that makes this dip THE BEST. In a bowl, combine 1 cup mayonnaise with 1 cup sour cream. Add 1 pkg. taco seasoning mix. I don't buy taco seasoning mix, so I always use my own mix, which I prefer BUT either tastes great. I have included my seasoning mix recipe at the bottom of this post. You're welcome. The 1/3 tsp. chili powder from the original recipe seems like a typo to me, so I've always just added another tsp. chili powder to my mix. Whisk together, then spread on top of the avocado layer, making sure to cover edges.

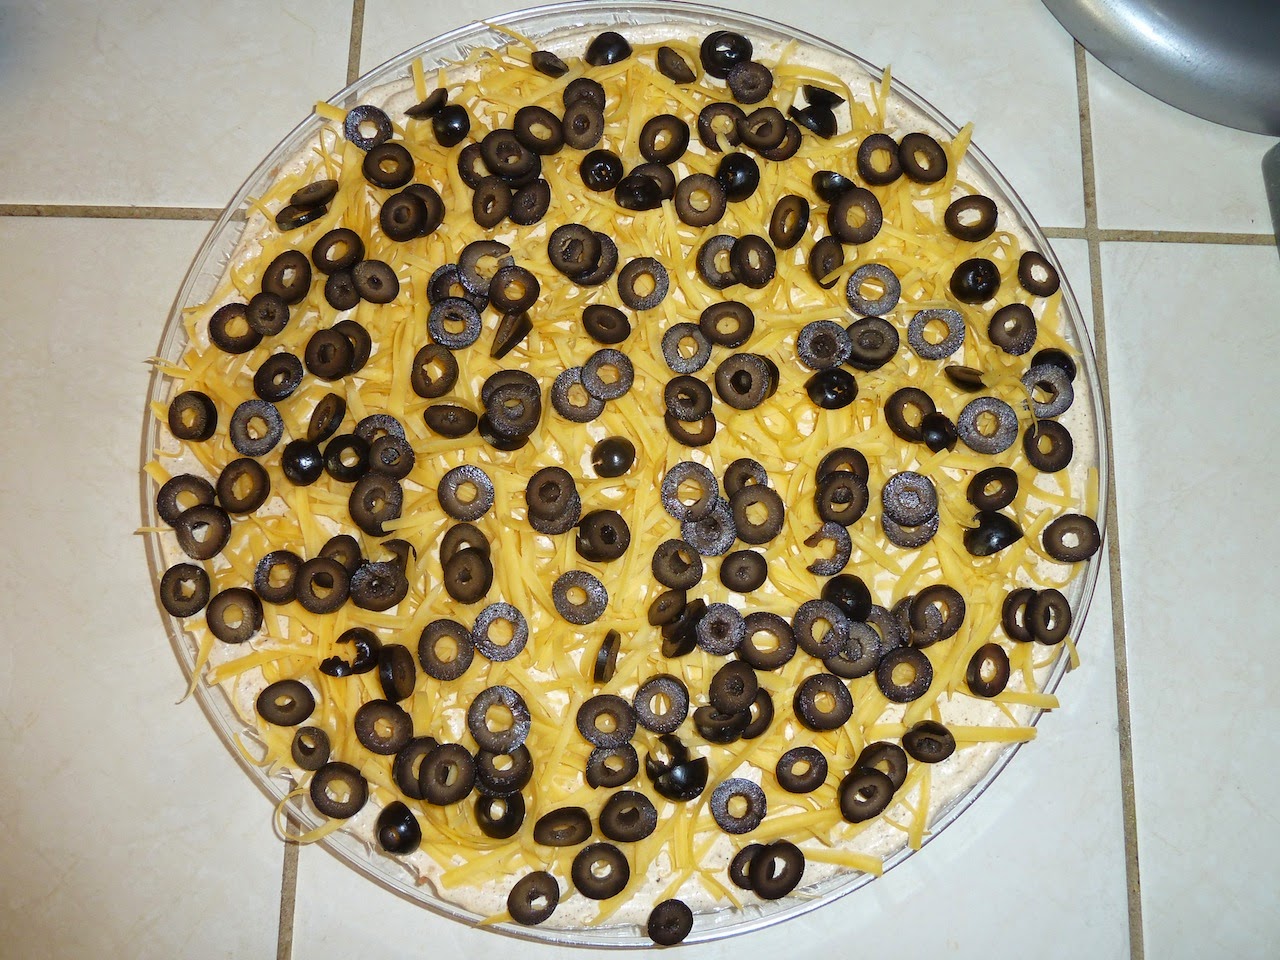
Next add the cheese. I like the big shreds (v the finely shredded cheese) because I like to TASTE the cheese.

Slice up a can of black olives and sprinkle them on (this may be a can minus about... 5 olives).

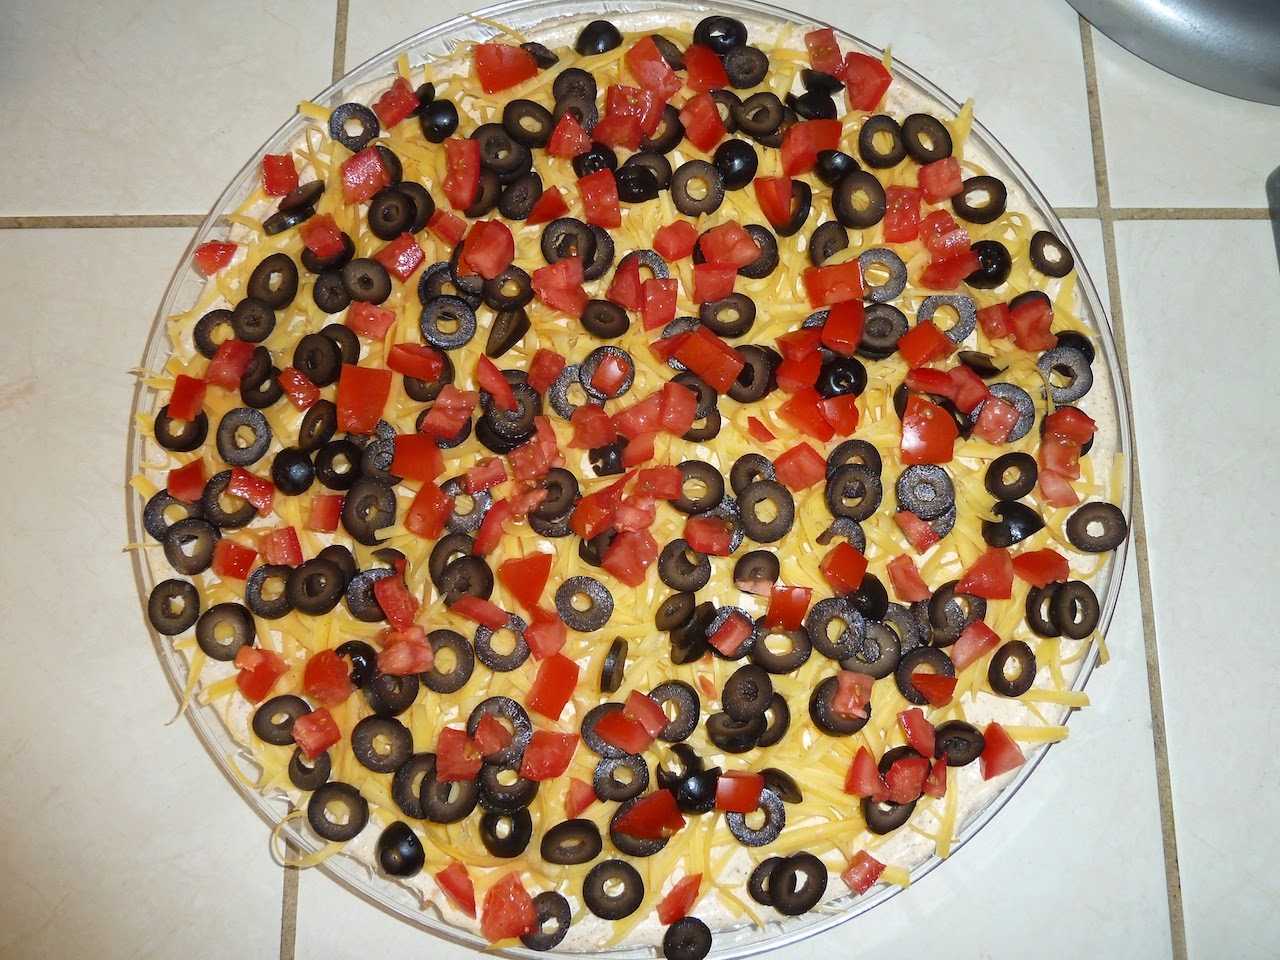
Then chop up some roma tomatoes (I try to de-juice them a little by scraping out the juicy seeds) and sprinkle them on.

Since I was kinda in a hurry, I forgot to take a picture of the final dip before I wrapped that baby up to deliver to the school. I decided to make my final layer some cilantro leaves, since I figured the teachers may want to avoid onion-breath for their conferences. You can use either cilantro or green onions, or both. I really prefer both.

Since I had gone to all the effort to take pictures along the way, I figured I could sacrifice one or two minutes to un-saran the dip for a decent finished product. (I may have sprinkled on a few green onions once the saran was off before re-wrapping... post picture.)

I'm telling you, it's the best.

Here's the recipe in short form:

2 (15oz) cans refried beans
2 large, ripe avocados
salt, to taste
2 tsp. lemon juice
1 cup sour cream
1 cup mayo
1 pkg. taco seasoning mix (my mix below)
1 tsp. chili powder
1 cup + shredded cheese
1 can black olives, sliced
3 roma tomatoes, diced
2 green onions, chopped
cilantro (optional)

Mix refried beans and spread on platter. Mash avocados with salt and lemon juice, then spread over bean layer. Mix sour cream, mayo, taco seasoning mix and chili powder together and spread over avocado layer. Sprinkle on cheese, olives, tomatoes, green onions, and cilantro if using. Serve with corn chips.

TACO SEASONING MIX:

2 Tbs. dried minced onion
1 tsp. salt
1 tsp. chili powder
1/2 tsp. cumin
1/2 tsp. dried crushed red pepper
1/2 tsp. granulated garlic
1/2 tsp. corn starch
1/4 tsp. dried oregano

Sunday, September 14, 2014

My Favorite Lemon Bars


I've used this recipe forever. On occasion I have tried other lemon bar recipes and then wonder why I did. These, in my humble opinion, are the best. Flat out. No need to search any longer.

Here is where the original recipe came from:


My mom gave this to me when I got married... pert near 27 years ago. It's been well used and well loved, can you tell? (That cover page isn't actually ON the cookbook - I just keep it because I'm an obsessive compulsive memorabilia keeper on a sentimental journey - haha.)

Here's a glimpse of the actual recipe:


Have I mentioned I'm a messy baker? If not, I confess. I am. Did the cookbook page give it away?
A big THANK YOU to Ida and Nyla (don't you love those names?)!


Here is a slightly modified, simpler-to-read recipe for

MY FAVORITE LEMON BARS

2 cups flour
1 cup powdered sugar
1 cup (2 cubes) butter (I have NO IDEA what "oleo" is!), slightly softened
Pinch of salt

Blend well together (I use a pastry blender) and pat into a foil-lined 9x13" pan. Bake at 300 degrees for 15 minutes.

4 eggs, slightly beaten
6 Tbs. fresh lemon juice
grated rind of 2 lemons (or more)
2 cups sugar
5 Tbs. flour
1 tsp. baking powder

Mix eggs, lemon juice, and grated lemon rind in a small bowl. In a medium bowl, sift together sugar, flour, and baking powder. Add the egg and lemon mixture to the flour mixture, then pour on baked crust and bake an additional 25 to 30 minutes at 350 degrees. Transfer to a wire rack and cool completely. Sprinkle with powdered sugar, lift out of pan, and cut into bars.


Notes:  (1) A friend of mine mentioned that she puts the lemon rind in the crust mixture. I have tried it, but felt like the rind adds more flavor in the filling. If you have plenty of lemon rind, you could add some to both. I love a TART lemon bar, so might try that the next time I make them.

(2) This recipe is oh-so-similar to Paula Deen's, which is where I learned about the foil-lined pan. The foil totally makes cutting them into perfect bars so much easier (and the delectable edges don't get stuck to the sides of the pan). That's a hot tip.

(3) I can't tell you how many times I have burned myself on the pre-baked crust pan. Remember that it just came out of an oven. It's hot. Once you've pour on your cold-ish filling it's easy to forget. Just sayin'.

Enjoy a mouth full of sunshine!

Tuesday, July 22, 2014

Stove Top Mac-n-Cheese

I made this last night in an effort to put dinner on the table FAST. I've used various mac-n-cheese recipes over the years, but thought I would try something different and I knew I had pinned a few recipes on Pinterest. They all, however, called for cream cheese or cream, of which I had neither. I also wanted to avoid the lengthy second step of many recipes that call for baking in the oven. I needed FAST. After spending too much time looking for a recipe, I turned to good ol' reliable google.

"best stove top mac and cheese"

This recipe popped up on top of the list, so I glanced through the ingredients. Hmmmm... interesting. It called for eggs. No flour roux, no cream, no cream cheese. I figured I might as well give it try.

I used this pasta
and doubled the recipe, planning for summer-day-lunch leftovers.

Bill's comment: "I think this is the best mac-n-cheese you have ever made."

Shilo's comment: "I need this recipe for college. This is so good."

Mauri's comment: "I ate more than I thought I would." (She had just had a pancake an hour before dinner - go figure.)

I didn't snap a pic of my final product, and figured a pic of the refrigerated leftovers might not do it justice. Imagine cheesy, creamy deliciousness. Next time I make it I'll try to remember to memorialize it.


The Best Mac-n-Cheese I Have Ever Made (a la Alton Brown)

1/2 lb. elbow macaroni (I used Cellentani, and doubled the recipe)
4 Tbs. butter
2 eggs
6 oz evaporated milk
1/2 tsp. hot sauce (I used Cholula)
1 tsp. kosher salt (I used slightly less)
Fresh black pepper
3/4 tsp. dry mustard
10 oz. sharp cheddar, shredded (I used medium cheddar, since that's what I had on hand)

In a large pot of salted boiling water, cook pasta al dente, then drain. Return to the pot and melt in butter (I pre-melted the butter in the microwave to speed things along). Toss pasta to coat.

Whisk together eggs, milk, hot sauce, salt, pepper, and mustard. Stir into the pasta and add the cheese. Stir over low heat until cheese is melted and sauce is creamy and smooth, at least 3 minutes.

Note: This was super creamy and rich, which my family {loved}. My personal preference (from growing up on milkier/runnier mac-n-cheese) is a slightly "looser" texture. In my double batch next time I'm going to try eliminating one egg, and slightly increasing the milk quantity. I'll post the update.

Easy.
Yummy.
Quick.

Happy family.

Gotta love that.

Saturday, July 19, 2014

The Best S'mores Bars EVER


I work with a fabulous baker in the Young Women organization at my church. She seriously makes the best treats EVER. A few months back she made these for one of our Priest/Laurel activities and I couldn't get enough of them (not good for my not-really-a-diet-but-I-need-to-lose-weight regime). I had texted her for the recipe, then asked her in person a week or two later, and finally sent a text a week or two later that I wanted it NOW, if possible (obviously my first two attempts were too gentle).

It was a Sunday evening, and I was craving something sweet, and Bill wanted to take some treats to a couple of families in our ward. My friend Kristen responded in a very timely manner (so sweet of her to take time out to do it for me), and I started to whip up a double batch. Since she has an iphone and I have an android, the texts came in all jumbled (could somebody fix that, please?), so I was trying to decipher the recipe while using what I had on hand.

They still turned out seriously so good!
These went a little long under the broiler, but my family thought they were more "s'mores-y" with some dark brown anyway (thankfully no BLACK). YUM!

I told Kristen I was posting the recipe so I could share it with my family and friends (and, selfishly, so I can access it wherever I may be at any given moment without having to figure out the text puzzle).

Here it is:

Kristen Jorgensen's S'mores Bars

1 cup unsalted butter, softened (I used salted)
3/4 cup granulated sugar
3/4 cup dark brown sugar (I used regular brown)
2 tsp. vanilla
1 egg
1 tsp. salt
1/2 tsp. baking soda
1-1/2 cup all-purpose flour
1-1/4 cup graham cracker crumbs (very close to 1 full sleeve of graham crackers)
1 bag of mini marshmallows (I only had large, so cut them in fourths)
3 to 4 full-size Hershey chocolate bars broken into pieces (I used Guittard milk chocolate chips)

Instructions:
Preheat oven to 375 degrees. In a large bowl, cream together the butter and sugars. Add the egg and mix until incorporated. Add the vanilla, salt and baking soda; mix well. Mix in the flour and graham cracker crumbs until the dough comes together.

In a 9x13 pan, press the dough evenly on the bottom of the pan. Bake for 13 minutes. Take pan out of the oven and spread enough mini marshmallows to cover the top of the dough. Stick small pieces of the Hershey chocolate bar all over the top in between the marshmallows. Bake for an additional 3 minutes. Let sit for at least 10 minutes before attempting to cut into bars.

Kristen's notes:  It is better to let it cool before cutting into bars. (My note: if you are serving out of the pan, they are divine served warm!!) I also put mine under the broiler for just 30 to 60 seconds for a little browning of the marshmallow. If they don't start browning quickly, pull them out before they start getting melted completely. Also, when you pull the bars out after 13 minutes (before putting the toppings on), it will look jiggly in the middle but set up around the edges - that's how it should be.

I only had these cake pans to make the bars in that we were giving away, so I divided the dough in half and baked everything at the same time. I think they worked out perfectly. Obviously I didn't broil at the same time, and didn't intend to get our pan so dark, but they were still delicious either way.

If you like s'mores, I promise you will LOVE these!

Tuesday, June 3, 2014

Parker House Rolls a la Bobby Flay

I love these rolls.

Thank you, Bobby Flay.


PARKER HOUSE ROLLS A LA BOBBY FLAY

Ingredients:
1-1/2 cups milk
1 stick butter, cut into pieces, plus more for brushing
1/2 cup sugar
1 pkg. active dry yeast (I used 1 Tbs.)
1/2 cup warm water
3 large eggs, lightly beaten
1-1/2 tsp. salt
6 cups all-purpose flour

Directions:
Place milk in a small saucepan and bring to a simmer. Remove from heat, then stir in the butter and sugar and let cool. (I placed the milk and butter in the microwave until the butter was melted, then stirred in the sugar and let cool.) Dissolve yeast in warm water and let sit until foamy. Combine milk mixture, eggs, yeast, salt, and 1/2 of the flour in a mixer with the dough attachment (I used my KitchenAid) and mix until smooth. Add remaining flour, 1/2 cup at a time, and stir until a smooth ball forms.

Remove from the bowl and knead by hand on a floured surface for about 5 minutes. Place in a greased bowl, cover, and let rise in a warm place until doubled, about 1 hour. On a floured surface, punch down the dough and shape as desired. Place on a parchment-lined baking sheet; cover again and let rise until doubled, about 30 to 40 minutes.

Preheat oven to 350 degrees. Bake for about 20 minutes or until golden brown. Remove from oven and brush with melted butter before serving.

I tried shaping the rolls (pictured above) using a technique by Alex Guarnaschelli I saw in a Food Network magazine. I like it! Here is a link if you're interested (slide 11-17).

(If you go to the Bobby Flay link there is a video of him making rolls, and after watching I have concluded that he has no idea how to shape rolls.)

Italian Sodas

We served these for Shilo & Cheyenne's graduation party and they were a huge hit.

You can buy the syrup online direct from Torani, and if you order over $59, the shipping is free. World Market may have them also, you are just limited to the flavors they carry. We like to use the syrup for slushies and shaved ice all summer long.


ITALIAN SODAS

In a 16oz glass or plastic cup:

Pour 1/4 c. flavored syrup (if you are mixing flavors, you want them to total 1/4 cup) in bottom, then
Fill glass or cup 3/4 full of ice
Add 2/3 cup sparkling mineral water (or club soda)
Pour in 2 to 4 Tbs. heavy cream

(Note: I use 2oz shot glasses/cups to measure. 1 (2oz) measure of syrup, any combination, 1 (2oz) measure of cream. Just makes all that measuring stuff easier.)

Stir with a straw.
Enjoy.
And then enjoy another flavor.
Seriously, you may not be able to stop.

Lucky us, I slightly overbought for the party, so we have a stash that will last us (and our company) for a long, long time. Come see us and we'll serve you up.

Iced Hot Chocolate

I had to search for this recipe today on my family blog, so I thought I would quickly transfer it here where it is more easily found and accessible. I still have quite a few of these containers of Swiss Miss, so I think I'll share them with friends this summer along with this great recipe. YUM!


ICED HOT CHOCOLATE

Put in blender (my old $20 basic Oster does a great job - no need for a VitaMix):

2 cups cold milk
6 Tbs. hot cocoa mix (more if you like)
approx. 2 cups ice

Blend.
Pour into glasses.

Starbucks fancy style (unnecessary unless you are blending to impress):
top with whipped cream and drizzle with chocolaty syrup.

Drink with a straw.
Makes 3 servings.

Note: I have tried making this with another hot cocoa mix and didn't like it nearly as well as the Swiss Miss. I'm not saying you can't make it with another mix, I just can't guarantee you will get the same results ;-) If you get BETTER results with another mix, please, feel free to share!

HELLO SUMMER!

Tuesday, January 21, 2014

The Best Jello Salad

Here's my current favorite Jello Salad, recipe courtesy of my friend Jeanne (who saved me on the 4th of July when I was trying to make it from memory - not a good idea  - for the whole gang and needed clarification.  She was in Hawaii - I had forgotten the time difference - and returned my call, apologizing for the delay in her response, but it was only 7am there.  She's a gem).


(I usually double the recipe when I am making it for a group.)

Jeanne Leak's Jello Salad

1 small pkg. cook-style vanilla pudding (can use sugar-free)
1 small pkg. cook-style tapioca pudding (can use fat free)
1 small pkg. Jello (can use sugar-free, any flavor)
3 cups water

Mix all together and bring to a boil.  Let cool 2 to 3 hours or overnight in the refrigerator.

Mix cooled Jello, making sure to blend well (no chunks - I use a big whisk).

Fold in fruit of your choice (mandarin oranges, strawberries, or my favorite, raspberries)
and 1 (8oz) Cool Whip (can use light - NOT fat free).

You can serve immediately, or refrigerate for later.


It's a little reminiscent of the Jello salad that has cottage cheese, WITHOUT the cottage cheese.  The tapioca pudding absorbs the jello, and you end up with brightly colored tiny soft balls of tapioca.

YUM-O.


Chocolate Raspberry Crash Cake


I usually try to make German Chocolate Cake for Bill's Birthday, but was a little pinched for time yesterday. I quickly perused Pinterest for a quick, easy and YUMMY alternative (with ingredients I already had on hand), and found this recipe and decided to give it a try (making a few adjustments). I had invited our neighbors over for cake and candles, so I hoped it would be good!

It was yummy. And pretty to look at. Definitely a keeper.

I didn't get any great pictures of the cake (focused on the Birthday part of things), so these will have to do:


Chocolate Raspberry Crash Cake

1 Dark Chocolate Fudge cake mix, prepared per package directions; baked in a 9x13 pan; cooled
2 sm. boxes instant chocolate pudding
3-1/2 cups milk
2-1/2 cups whipping cream
3 Tbs. confectioners sugar
2 tsp. vanilla
1 pkg. frozen raspberries, thawed (fresh raspberries would be awesome if you have them!)

While the cake is baking, prepare instant pudding using 3-1/2 cups milk (I like the pudding just a tad thicker - you could use the 4 cups milk per package directions if you would like).  Put in refrigerator to set.

Whip the cream with the confectioners sugar until stiff peaks are just about to form. Add vanilla and whip a few seconds more (I like fairly stiff whipped cream, too). Refrigerate until ready to assemble cake.

When ready to assemble, cut cake into small squares. Using approx. 1/3 of the cake, pull out and break up cake pieces to cover the bottom of a trifle bowl.

Using 1/2 of the prepared pudding, spoon onto cake layer and smooth out with back of spoon.

Spoon approx. 1/3 (or slightly more) of the whipped cream on top of the pudding, carefully spreading to edges.

Sprinkle on 1/3 of the raspberries.

Repeat layers starting with cake pieces.

Add one more layer of cake pieces, and top with remaining whipped cream and berries.
(Since my frozen berries didn't look that awesome, I didn't put any on top).

Keep in freezer for about 15 minutes before serving.

I think this cake would be best assembled within 30 minutes of serving. All the components can be prepared well ahead of time, and assembly takes 5-10 minutes, depending on how meticulous you are.

YUM!